 Save to Pinterest
 My sister called me three days before Mother's Day in a mild panic—she'd promised to bring dessert to our family gathering but had nothing planned. I found myself at her kitchen counter at 9 PM, and we decided on pavlova, a dessert I'd only attempted once before. As the mixer whipped egg whites into clouds, she told me about watching our mom make this exact dish decades ago, how the kitchen would smell like vanilla and how patient she'd been teaching my sister to fold ingredients without deflating the meringue. By the time we slid that glossy nest into the oven, I understood why this dessert feels like love in edible form.
When I finally pulled that pavlova out of the oven at our Mother's Day brunch, my mom's eyes actually teared up—not because it was perfect (it had a tiny crack on one side), but because it represented this unbroken chain of women in our kitchen, each learning from the one before. That's when pavlova stopped being just a dessert to me and became something I'd want to make for every celebration worth remembering.
Ingredients
- Egg whites (4 large, room temperature): Room temperature whites whip up faster and hold more air—take them out of the fridge at least an hour before you start, it genuinely makes a difference.
- Superfine sugar (1 cup/200 g): Regular granulated sugar takes longer to dissolve and can leave grittiness; superfine dissolves almost instantly, giving you that silky glossy finish.
- Cornstarch (1 tsp): This is the secret that keeps the center marshmallow-soft while the edges stay crisp and snappy.
- White vinegar (1 tsp): Stabilizes the meringue and prevents it from weeping or collapsing as it cools, learned this the hard way after a soggy disaster.
- Pure vanilla extract (1 tsp): Adds a whisper of flavor that rounds out the sweetness without being obvious.
- Salt (pinch): Enhances the egg white's ability to hold air, tiny but essential.
- Heavy whipping cream (1 cup/240 ml, chilled): Cold cream whips faster and holds its shape better; I chill my bowl and beaters too.
- Powdered sugar (2 tbsp for cream, plus optional dusting): Dissolves instantly into cream without grittiness like granulated would.
- Mixed berries (4 cups total—strawberries, raspberries, blueberries, blackberries): Use what's in season and at peak ripeness; the variety of colors and tartness levels creates complexity that plain vanilla cake could never achieve.
- Fresh mint leaves (optional): Adds a green freshness that makes the whole plate feel lighter and spring-like.
Tired of Takeout? 🥡
Get 10 meals you can make faster than delivery arrives. Seriously.
One email. No spam. Unsubscribe anytime.
Instructions
- Set your stage:
- Preheat your oven to 250°F (120°C) and line a baking sheet with parchment paper, then trace a 9-inch circle as your guide—this keeps you from spreading too wide and helps the pavlova bake evenly.
- Whip those whites:
- In a spotlessly clean, dry bowl, beat your room-temperature egg whites with a pinch of salt until soft peaks form—they should look foamy and light but still slightly droopy. Any trace of yolk or grease will sabotage this step, so wash your bowl with hot soapy water and dry it completely.
- Build the meringue:
- Add your superfine sugar one tablespoon at a time, beating continuously between additions—this slow approach dissolves the sugar so completely that you'll end up with glossy peaks instead of a grainy mixture. Keep beating until the meringue is stiff and shiny, about 5 to 6 minutes total.
- Fold in the secrets:
- Sprinkle the cornstarch, vinegar, and vanilla over the meringue and fold gently with a spatula using broad, sweeping motions—you want to keep all that air you've beaten in, so resist the urge to stir vigorously.
- Shape your nest:
- Spoon the meringue onto your parchment circle and use the back of a spatula to form it into a nest shape with slightly raised edges—don't worry about perfection; rusticity looks intentional.
- Bake low and slow:
- Slide it into your oven for 1 hour 15 minutes at that gentle 250°F; the low temperature creates that signature contrast of crispy exterior and marshmallow center. When time's up, turn off the oven and crack the door open just slightly, letting the pavlova cool completely inside for at least an hour.
- Whip the cream:
- While everything cools, chill your mixing bowl and beat your cold heavy cream with powdered sugar and vanilla until soft peaks form—it should be pillowy and billowy but not stiff.
- Assemble the beauty:
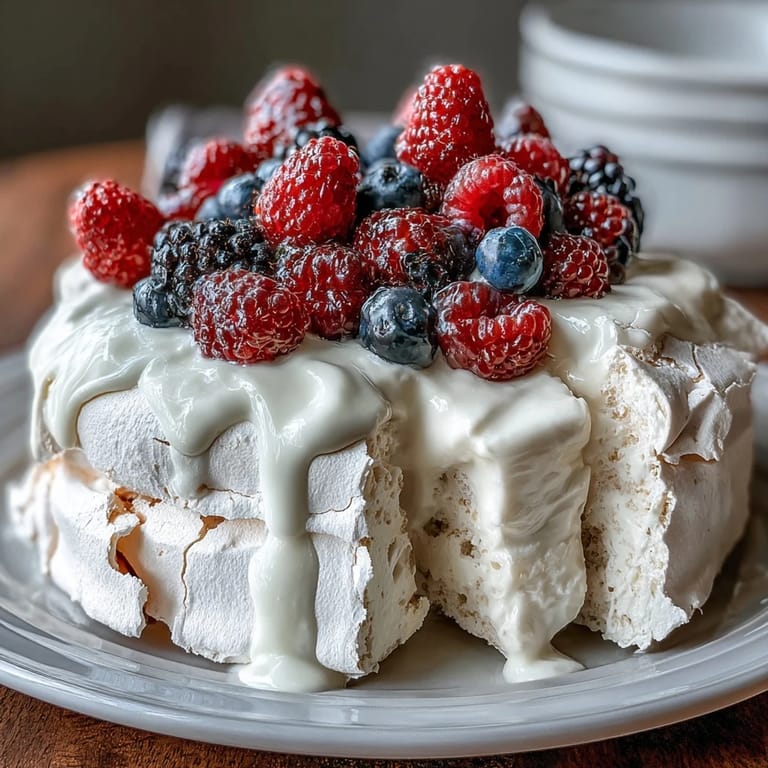
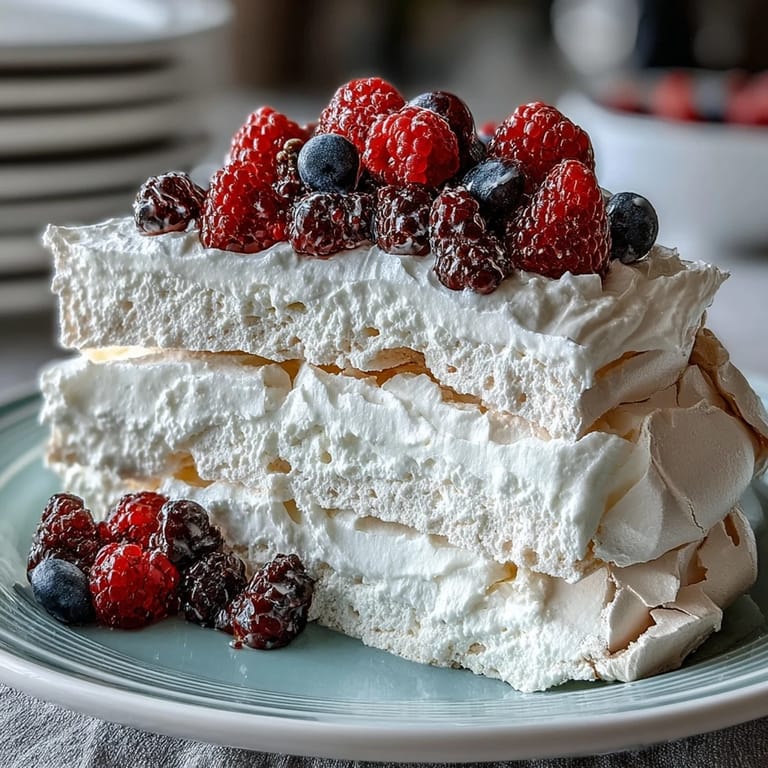
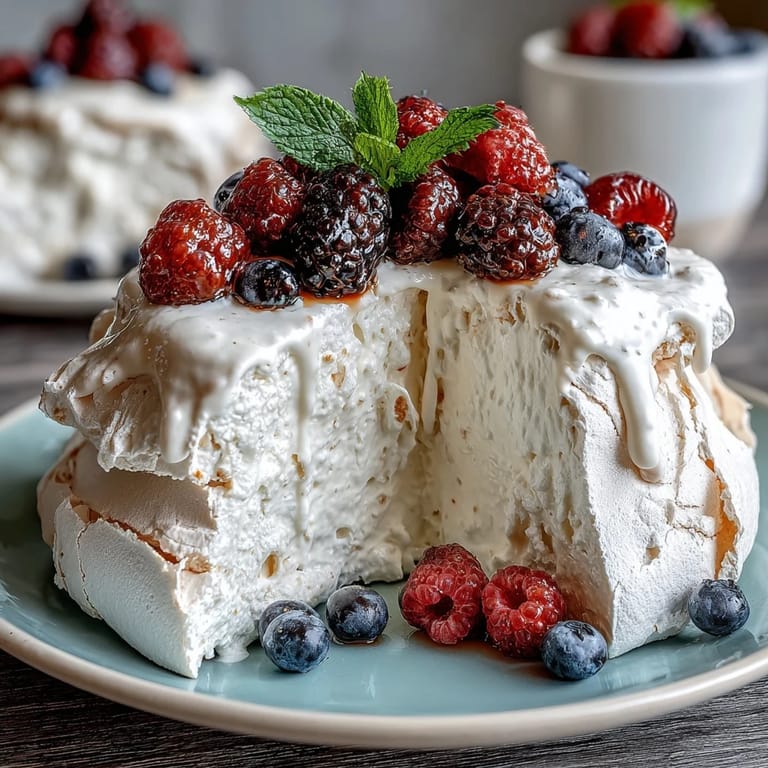
- Once your meringue is completely cool, transfer it carefully to a serving platter, pile on that whipped cream, then scatter your mixed berries and mint leaves across the top like you're creating edible art. The contrast of colors should make people reach for their cameras before their forks.
- Final flourish:
- Just before serving, dust lightly with powdered sugar if you like—it adds a fairy-tale quality that guests will photograph instantly.
 Save to Pinterest
 There's a moment, usually about five minutes before serving, when I look at the finished pavlova sitting on the platter—that golden-brown nest holding clouds of cream and jewel-like berries—and feel this small rush of accomplishment. It's not complicated food, but it's impressive in a way that makes people feel celebrated, which I think is the whole point of Mother's Day anyway.
When to Make This Meringue Magic
Pavlova is one of those desserts that actually gets easier the more you make it because you start understanding what the meringue is telling you—how it should sound when you whip it, how it should look at each stage, the tiny signs that it's ready. I've made this for Mother's Day brunches, spring celebrations, and even a summer dinner party when I wanted something that wouldn't heat up the kitchen. It's perfect whenever you need a show-stopper that won't keep you chained to the stove all day.
Variations and Creative Twists
Once you've mastered the basic meringue, you can play around endlessly—try seasonal fruit swaps like peaches in summer or kiwi in winter, or go chocolate by folding in sifted cocoa powder before baking. I've even experimented with a passion fruit curd layer between the meringue and cream, which adds this beautiful tartness that balances the sweetness. The foundation is so solid that you can really make it your own.
Storage and Make-Ahead Magic
The meringue base keeps beautifully in an airtight container for two days, which means you can bake it Friday night and assemble everything Saturday morning—a huge relief when you're hosting. The assembled pavlova is best eaten within a few hours of putting it together though, once the berries release their juices, the textures start to blur together, so aim for just before service if you can.
- Make the meringue base up to two days ahead and store it covered at room temperature, away from humidity.
- Whip your cream and pick your berries a few hours before serving to keep everything fresh and bright.
- If you're short on time, buy pre-whipped cream and fresh berries from the market—nobody needs to know, and the meringue is the real star anyway.
 Save to Pinterest
 This pavlova has become my go-to celebration dessert because it feels special without asking you to be a pastry chef. Every time I make it, I think of my sister and my mom, and how food has this quiet way of stitching people together across years and moments.
Recipe FAQs
- → How do I achieve a crisp meringue shell with a soft center?
Bake the meringue at a low temperature and allow it to cool completely inside the oven with the door ajar to maintain crispness outside and softness inside.
- → Can I substitute the mixed berries with other fruits?
Yes, seasonal fruits like kiwi, peaches, or passionfruit can be used to vary the topping and add different flavors.
- → What is the best way to whip the cream for topping?
Use chilled heavy cream, add powdered sugar and vanilla, then whip until soft peaks form to create a light and fluffy topping.
- → Is this dessert suitable for gluten-free diets?
Yes, the pavlova base contains no gluten ingredients, making it suitable for gluten-free diets.
- → How to prevent meringue from becoming sticky or soft in humid weather?
Prepare and bake the pavlova on dry days, as humidity can cause the meringue to absorb moisture and lose its crispness.