 Save to Pinterest
 A few summers ago, I showed up to a Fourth of July potluck with my hands full and my confidence shaky—I'd volunteered to bring dessert but forgotten until the morning of. Standing in my kitchen watching the clock tick toward departure, I realized I couldn't pull off a baked cheesecake in time, so I invented this no-bake flag cake on the spot, layering cream cheese dreams with fresh berries in patriotic stripes. My nephew was the first to notice it looked like an actual flag, and that moment when everyone gathered around before cutting into it made the whole last-minute scramble worth it.
I'll never forget my mother-in-law's face when she watched me build this cake—she'd brought store-bought desserts to every gathering for years, and when she saw how simple it was, she made three of these the following week, one for each of her book club members. Now she texts me photos of her variations come summer, and somehow a dessert has become our quiet tradition together.
Ingredients
- Graham cracker crumbs (2 cups): The foundation deserves respect—finely crushed crackers create a sturdy base that holds everything without crumbling apart, and the slight sweetness balances the rich filling beautifully.
- Unsalted butter, melted (1/2 cup): This binds the crust together and should be warm enough to coat every crumb evenly, transforming dry crumbs into something that feels almost like soil you can actually compress.
- Cream cheese, softened (16 oz): Never skip the softening step—cold cream cheese will create lumps that no amount of beating can fix, so leave it on the counter for a solid hour before you even think about mixing.
- Heavy whipping cream, cold (1 cup): The magic ingredient that creates that cloud-like texture; keep your bowl chilled and your beaters cold, and you'll reach stiff peaks in minutes instead of wrestling with it.
- Powdered sugar (1 cup): Sifting it beforehand prevents lumps in your filling and dissolves more smoothly into the cream cheese than granulated sugar ever could.
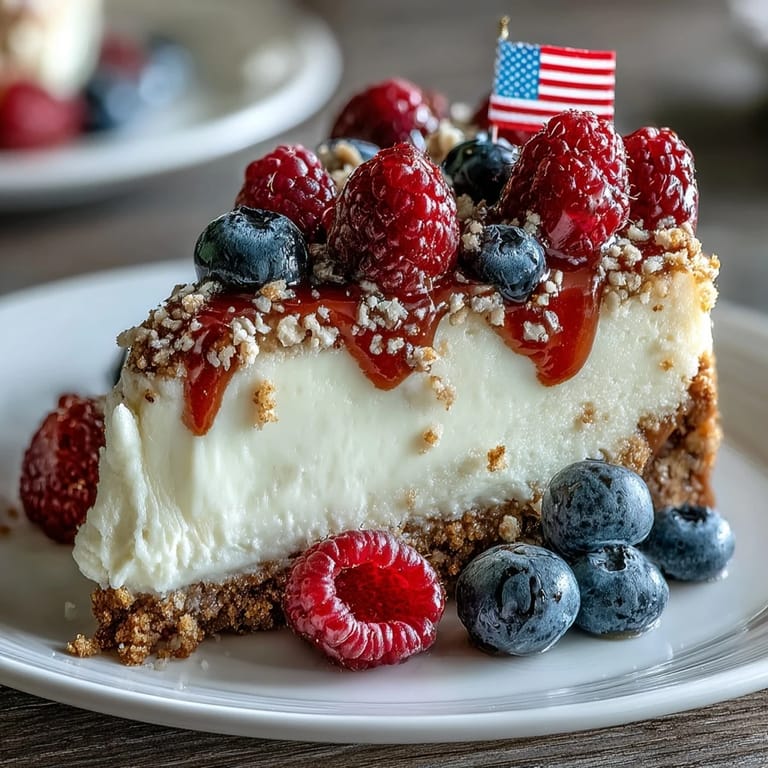
- Fresh blueberries and strawberries: Choose berries that are ripe but still firm, and buy them the day before serving so they maintain their shape and aren't bruised from early handling.
- Lemon zest (optional): A whisper of brightness that cuts through the richness—if you add it, use a microplane and don't overdo it, as one lemon zests further than you'd expect.
Tired of Takeout? 🥡
Get 10 meals you can make faster than delivery arrives. Seriously.
One email. No spam. Unsubscribe anytime.
Instructions
- Build your foundation:
- Mix the graham cracker crumbs with melted butter, sugar, and salt until it resembles damp sand—you should be able to squeeze a handful and have it hold together. Press this firmly and evenly into your baking dish, creating an even layer about 1/4 inch thick that will support your creamy filling without crumbling when sliced.
- Chill the crust:
- Pop the crust in the refrigerator while you prepare the filling; this gives it time to set and creates a cool surface for your cheesecake layer to rest on.
- Prepare the cream cheese base:
- Beat your softened cream cheese until it's completely smooth and has no visible lumps—this usually takes 2-3 minutes with an electric mixer on medium speed. Add your powdered sugar, vanilla extract, and lemon zest if using, and beat until everything is fully incorporated and fluffy.
- Whip your cream to clouds:
- In a separate, chilled bowl, whip the cold heavy cream until you see stiff peaks form—the transformation from liquid to fluffy mousse happens quickly, so watch carefully to avoid overbeating and ending up with butter. The cream should look like soft peaks that hold their shape when you lift the beaters.
- Fold gently and carefully:
- This is where patience pays off; add the whipped cream to your cream cheese mixture in two additions, folding gently with a spatula using a down-and-across motion rather than stirring. Your goal is to maintain all those air bubbles that make the filling light and creamy, so resist the urge to be aggressive with your mixing.
- Spread your filling:
- Pour the mixture over your chilled crust and smooth it with an offset spatula or the back of a spoon, creating an even surface that's ready for its patriotic topping.
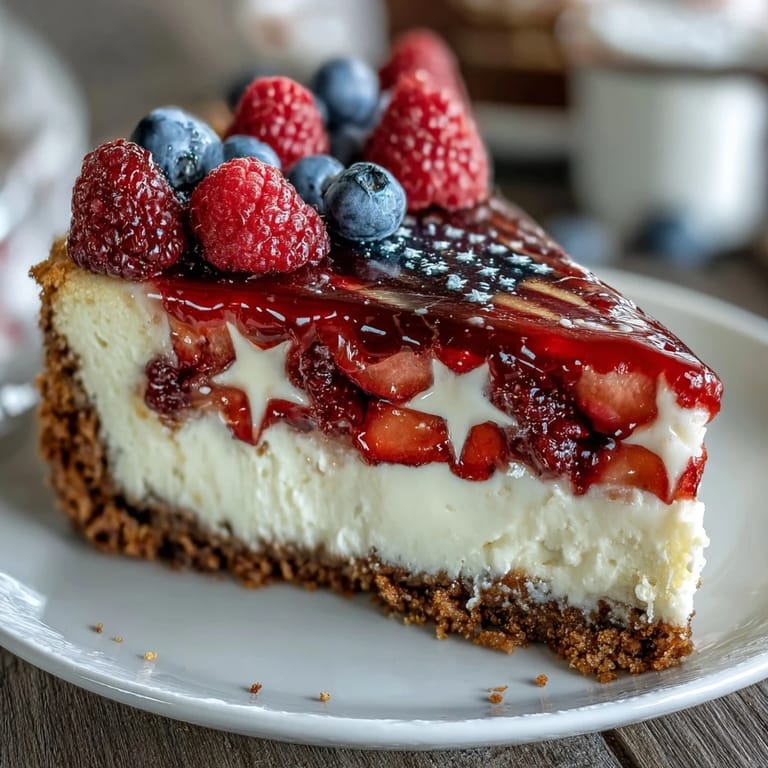
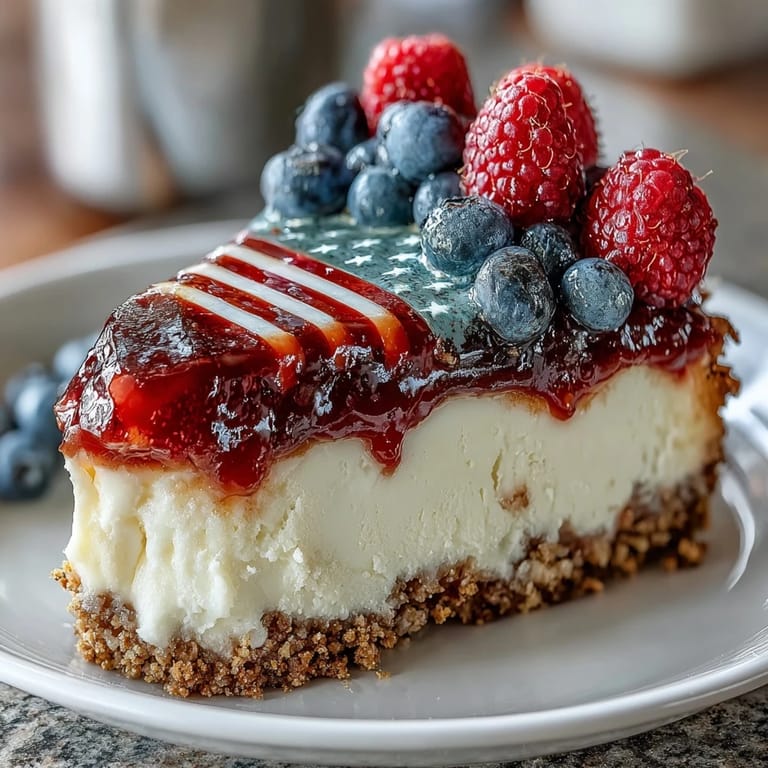
- Create your flag design:
- Arrange the blueberries in the upper left corner to represent the stars section, then lay alternating rows of sliced strawberries (and raspberries if you're using them) across the remaining space to create the stripes. Leave some white filling visible between the fruit to show your flag's white stripes, and if you want extra dimension, pipe whipped cream between the rows for definition.
- Chill until set:
- Cover the cake loosely with plastic wrap and refrigerate for at least 4 hours, though overnight is even better—this gives the flavors time to meld and the structure time to become firm enough to slice cleanly.
- Serve and celebrate:
- Remove from the refrigerator 10 minutes before slicing for cleaner cuts, and watch people's faces light up when they realize this stunning flag cake was made without an oven.
 Save to Pinterest
 What started as a last-minute kitchen panic has become the dessert I'm known for bringing—not because it's complicated or impressive in technique, but because it arrives looking like a celebration. There's something about serving food that's literally shaped like joy that reminds everyone why we're gathering together in the first place.
Make-Ahead Magic
One of the greatest gifts of this recipe is its flexibility with timing. You can prepare the crust and filling a full day ahead, covering the cake tightly with plastic wrap and letting it chill overnight—the flavors actually improve as everything melds together. The only part you should save for closer to serving time is arranging the berries on top, since the moisture from fresh fruit can slowly seep into the white filling and create a softer, less visually striking presentation.
Flavor and Color Variations
While the traditional red, white, and blue is impossible to beat for patriotic occasions, this cake's structure actually invites creativity depending on what's in season and what you're in the mood for. I've made versions with raspberries replacing some strawberries for deeper color, blackberries for mysterious depth, and even a springtime iteration with fresh mint leaves and white chocolate shavings scattered between the berries—the framework stays the same while the story changes.
Storage and Serving Tips
This cake lives happily in the refrigerator for up to three days, which means you can make it well in advance of your gathering and actually enjoy the party instead of being stuck in the kitchen. For slicing, a thin-bladed knife dipped in hot water and wiped clean between cuts creates neat portions without dragging the delicate filling around, and letting the cake sit at room temperature for exactly ten minutes before serving makes slicing dramatically easier.
- Keep a damp kitchen towel nearby when slicing so you can wipe your knife between cuts and achieve clean, professional-looking portions.
- If you're transporting this to a gathering, keep it on a flat surface in a cooler with ice packs rather than attempting to carry it in a warm car, as even a few minutes in heat can soften the structure.
- Leftover slices freeze beautifully for up to two weeks, so don't hesitate to make a full pan even for smaller celebrations.
 Save to Pinterest
 This cake has taught me that the most memorable desserts aren't always the ones requiring the most effort—sometimes they're simply the ones made with intention and served with joy. Every Fourth of July now, someone inevitably asks me to bring this, and I've stopped being surprised by how such a simple recipe has become something people actually crave.
Recipe FAQs
- → What is the best crust for this cheesecake?
A graham cracker crust mixed with melted butter and sugar creates a sturdy, flavorful base that complements the creamy filling.
- → How do I achieve the star and stripe decoration?
Arrange blueberries in the corner for stars, then lay sliced strawberries and raspberries in rows to mimic stripes for the flag effect.
- → Can I prepare this cheesecake ahead of time?
Yes, assemble up to 24 hours in advance and add the fresh berries just before serving for best appearance and freshness.
- → How long should the cheesecake chill?
Refrigerate for at least 4 hours to let the filling set firmly and the flavors meld together.
- → Are there options for dietary restrictions?
Use gluten-free graham crackers to make the crust gluten-free; the filling is naturally vegetarian.