 Save to Pinterest
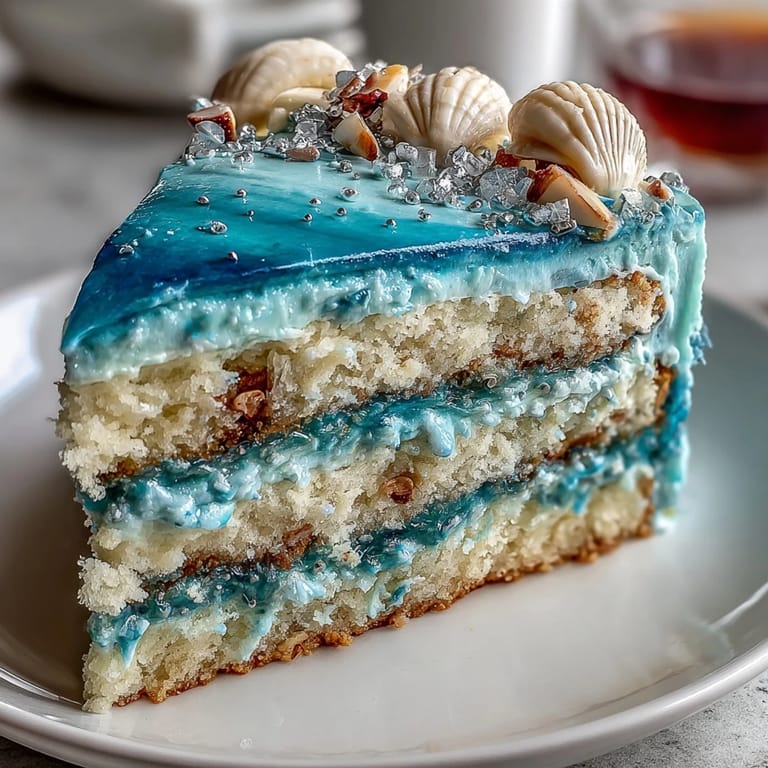
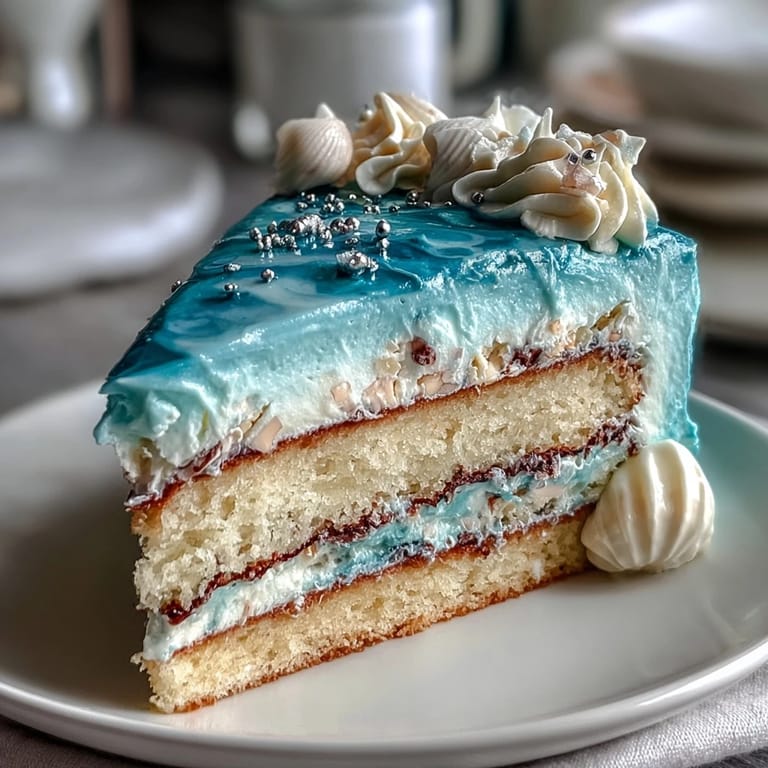
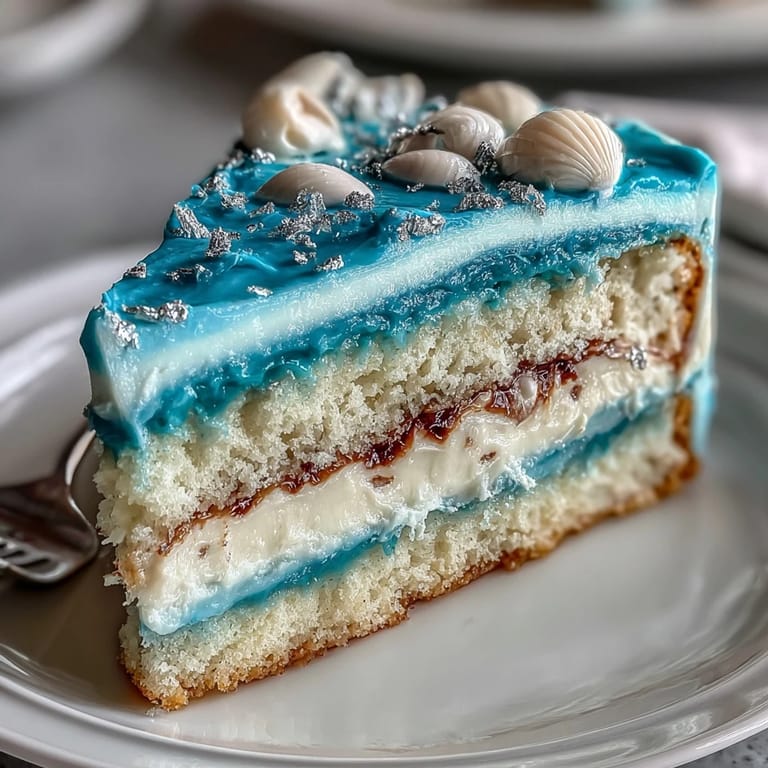
 My friend texted me a photo of her Pisces zodiac sign pendant one Wednesday afternoon, and something just clicked—she needed a birthday cake that matched her dreamy, water-loving soul. I'd never attempted an ombre frosting before, but standing in my kitchen with three cake pans lined up and gel food coloring bottles arranged like little jewels, I felt oddly confident. The vanilla sponge came together so easily, and watching those blue shades blend from pale sky to deep ocean on the frosting was genuinely meditative. That cake became the centerpiece of her party, and I learned that sometimes the most meaningful desserts are the ones you create with someone specific in mind.
I'll never forget pulling this cake out of the oven while my sister was on FaceTime, and she gasped when I showed her the golden-brown layers cooling on the rack. She kept saying it didn't look like something I made, which somehow both offended and delighted me. By the time we'd finished frosting it together over video call, she was genuinely convinced I'd become a pastry chef overnight. The best part wasn't the compliments—it was her asking me to make it again for her daughter's birthday three months later.
Ingredients
- All-purpose flour (2 ½ cups): Sifting it with the baking powder and salt ensures even distribution and keeps the cake tender instead of dense.
- Baking powder (2 ½ tsp): Don't skip sifting—clumps can create pockets of bitterness in your layers.
- Unsalted butter (¾ cup for cake, 1 ½ cups for frosting): Room temperature butter creams properly, trapping air that makes the cake fluffy and the frosting silky.
- Granulated sugar (1 ¾ cups): This dissolves completely into the butter, creating the light crumb structure that makes three layers feel weightless on your plate.
- Eggs (4 large, room temperature): Cold eggs don't incorporate smoothly; warm ones emulsify beautifully and add lift without deflating.
- Pure vanilla extract (1 tbsp for cake, 2 tsp for frosting): The vanilla anchors everything without overpowering the delicate cake or competing with the frosting's sweetness.
- Whole milk (1 cup plus ¼ cup): Room temperature milk creates a smoother batter and helps the frosting reach that perfect spreadable consistency.
- Powdered sugar (6 cups, sifted): Sift it even if you think it's fine—lumps will show up as gritty texture when you frost.
- Blue gel food coloring: Gel colors stay vibrant without thinning your frosting like liquid dyes would; have multiple shades ready for the gradient effect.
- Salt (pinch for frosting): This tiny addition cuts the sweetness and makes the blue shades appear more saturated.
Tired of Takeout? 🥡
Get 10 meals you can make faster than delivery arrives. Seriously.
One email. No spam. Unsubscribe anytime.
Instructions
- Prepare your pans and preheat:
- Heat your oven to 350°F and grease three 8-inch round pans, lining them with parchment—this prevents stubborn sticking and ensures even browning on the cake bottoms. Parchment is worth the extra step because removal becomes effortless and your cake layers stay intact for frosting.
- Combine dry ingredients:
- Sift flour, baking powder, and salt together in a medium bowl, then set it aside; this distributes the leavening evenly so your cake rises uniformly across all three layers. Sifting takes maybe two minutes but prevents dense pockets in your final cake.
- Cream butter and sugar:
- Beat softened butter and sugar in a large bowl for 3-4 minutes until the mixture looks pale and fluffy—this is when you're trapping air that will make your cake light. Listen for the mixer to shift from a heavy whirring sound to a lighter one; that's your signal you've creamed enough.
- Incorporate eggs and vanilla:
- Add eggs one at a time, beating well after each addition to emulsify properly, then mix in vanilla extract. Each egg should be fully incorporated before adding the next, or you'll end up with a broken-looking batter.
- Alternate flour and milk:
- Add one-third of the flour mixture, mix gently, then add half the milk, then another third of flour, remaining milk, and finally the last flour portion. This alternating pattern prevents overmixing, which would develop gluten and toughen your cake.
- Fill pans evenly:
- Divide batter equally among the three prepared pans and smooth the tops with a spatula so each layer bakes at the same rate. Uneven batter distribution means one layer might dome while another stays flat.
- Bake until golden:
- Bake for 25-30 minutes until a toothpick inserted in the center comes out clean and the edges pull slightly from the pan. The cake should smell sweet and vanilla-forward, and the tops should have a light golden color.
- Cool properly:
- Let cakes rest in their pans for 10 minutes—this firms them up enough to flip without breaking—then turn them onto a wire rack to cool completely. Cooling completely matters because warm cake absorbs frosting unevenly and looks slick instead of elegant.
- Prepare the frosting base:
- Beat softened butter until creamy, then gradually add sifted powdered sugar in batches, mixing thoroughly after each addition to prevent lumps. Once smooth, add vanilla and a pinch of salt, which will enhance the frosting's flavor and make the blue colors pop.
- Add milk to reach consistency:
- Mix in milk a little at a time until the frosting is smooth and spreadable—you want it thick enough to hold peaks but soft enough to blend colors smoothly. Too stiff and you'll fight blending; too thin and it'll slide off your cake.
- Create your color gradient:
- Divide frosting into four bowls and tint each with blue gel coloring, starting with a pale sky blue in bowl one and deepening to ocean blue by bowl four. Gel coloring requires only a toothpick-dab at first; you can always add more, but you can't remove it once mixed in.
- Stack and frost layers:
- Place the first cake layer on your serving plate, spread a thin layer of the lightest blue frosting on top, then repeat with the remaining two layers. Thin layers of frosting between cakes ensure stability and let you taste cake, not just sweetness.
- Create the ombre effect:
- Using an offset spatula, frost the sides and top with the lightest shade at the crown, gradually transitioning to deeper blues as you move down to the base, blending where colors meet. Work in sections and take your time blending—the gradient is what makes this cake stunning.
- Add finishing touches:
- Scatter white chocolate seashells, edible glitter, or blue-silver sprinkles across the top and around the base for an ocean-inspired final touch. These decorations aren't just pretty; they signal to everyone that this cake is special and intentional.
- Chill before serving:
- Refrigerate the finished cake for at least 30 minutes so the frosting sets and slices come out clean with sharp edges. A chilled cake also tastes better because the flavors feel more focused and the texture is firmer.
 Save to Pinterest
 The moment that made me love this cake wasn't actually about baking—it was watching my friend's eyes light up when she walked into her party and saw the ombre frosting catching the light like ocean waves. Her daughter immediately asked if she could help frost the next one, and suddenly we had three generations of us in the kitchen with piping bags and blue-tinted fingers, laughing about who made the worst frosting smudge. That's when I realized this wasn't just a pretty cake; it was an invitation to slow down and create something together.
The Science of Creaming and Why It Matters
Creaming butter and sugar for those 3-4 minutes isn't busywork—it's when the sugar crystals cut tiny air pockets into the butter, creating thousands of air cells that expand in the oven and give your cake that cloud-like crumb. The first time I rushed this step, my cake came out dense and heavy, and I spent an hour wondering what went wrong. Now I listen for the sound and color change instead of watching the clock; when the mixture is pale and fluffy, you'll hear the mixer sound lighter and airier. That's your signal that you've successfully created a foam structure that will support the rest of the batter.
Mastering the Ombre Frosting Blend
The ombre effect looks like magic, but it's really just patience and an understanding that colors blend better when they're next to each other gradually rather than in sudden jumps. I used to worry that I'd created obvious stripes, but I realized that blending a tiny bit of the darker shade into the lighter shade creates a transition zone that your eye reads as a smooth gradient. The key is working in sections around the cake rather than trying to frost the entire thing and then blend afterward, which just mashes the colors together muddy. Start at the top with the lightest shade, work your way down to the darkest shade at the base, and blend where two shades meet with gentle, horizontal strokes of your offset spatula.
Bringing the Ocean to Life with Decorations
Once your ombre frosting is set, decorations transform the cake from beautiful into genuinely memorable, but they work best when they feel intentional rather than randomly scattered. White chocolate seashells feel elegant and thematic, while edible glitter catches light in ways that make the cake feel ethereal and special. Sprinkles in blue and silver tones echo the water theme without fighting the ombre frosting for attention, and the best approach is to cluster them on top rather than covering the whole cake, which keeps the frosting visible and stunning.
- Place white chocolate seashells strategically on top instead of all over, letting them anchor the ocean theme without becoming clutter.
- Edible glitter works best applied to just the top third of the cake where light hits it, creating a shimmering effect that draws eyes upward.
- Choose sprinkle colors that complement your ombre gradient; silver and pale blue extend the ocean theme rather than contradicting it.
 Save to Pinterest
 This cake has become my go-to for celebrations that need to feel extra, and every time I make it, I remember that baking isn't just about following steps—it's about creating moments that people will describe to their friends with genuine excitement. The ombre frosting became my signature, and that confidence has spilled over into other decorating projects I never thought I could tackle.
Recipe FAQs
- → How do I achieve the blue ombre effect on the frosting?
Divide frosting into several portions and tint each with varying amounts of blue gel food coloring, from light to dark. Layer them carefully on the cake for a smooth gradient.
- → What is the best method to keep the cake moist?
Brushing the cooled cake layers with simple syrup before frosting helps retain moisture and adds a subtle sweetness.
- → Can I substitute any ingredients for dietary needs?
The cake contains wheat, eggs, and dairy; substitutions like plant-based milk or egg replacers would require recipe adjustments and testing.
- → How long should I chill the finished cake before serving?
Chilling the cake for at least 30 minutes helps set the frosting and enhances sliceability for clean servings.
- → What tools are essential for assembling this layered cake?
Electric mixer, offset spatula, round cake pans, parchment paper, and a wire cooling rack are key for smooth preparation and assembly.