 Save to Pinterest
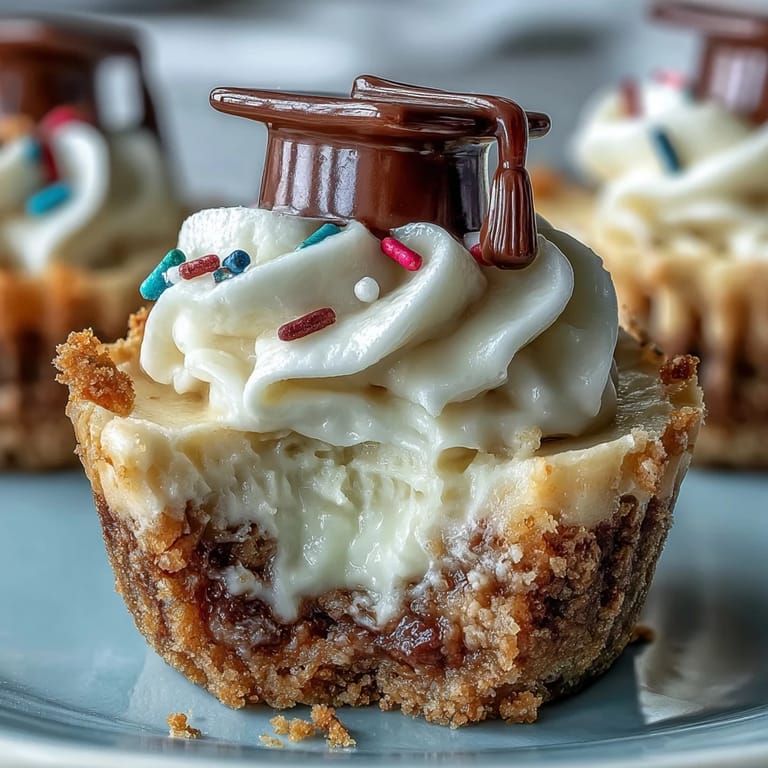
 Graduation season sneaks up on you: suddenly, the house is full of laughter, a hint of sharpie markers, and the sweet anticipation of what comes next. The first time I tried baking these cheesecake bites, it was purely out of self-defense—hungry teens kept raiding the pantry during decoration duty. The buttery scent curling from the oven was enough to draw even the committed balloon-blowers away from ceremony prep. Now, these are tradition at every milestone, sporting tiny hats fashioned with chocolate and licorice, crowding the dessert tray like a pack of proud little scholars. Baking these means embracing the cheerful chaos of celebration, one satisfying, creamy bite at a time.
I still remember last June, trays of these cooling on the counter, youngest cousin Adam staking out the kitchen and negotiating for early taste tests by promising not to touch the frosting for the cookies. My uncle, infamous for skipping dessert, claimed one, then two, then wisely walked away with a third when he thought we weren’t looking. Something about the gleam of whipped cream and a tiny hat on top makes every graduate—preschool to PhD—grin ear to ear.
Ingredients
- Graham cracker crumbs: An easy, forgiving base, they crunch just enough and bind well with butter—pressing them in firmly really helps the crust hold up.
- Granulated sugar: A bit in the crust and filling sweetens without overpowering—rub it in gently for an even mix.
- Unsalted butter: Melt it thoroughly for the crust; warm, not hot, lets everything combine evenly and avoids greasy spots.
- Cream cheese: Let it reach true room temp or you’ll battle lumps forever; I sometimes tuck the package by the stove while preheating the oven.
- Eggs: Add one at a time with a light hand—overmixing leads to cracks, but gentle folding keeps it creamy.
- Pure vanilla extract: Just a teaspoon, but it smooths out the flavor; I once ran out and missed its warmth.
- Sour cream: Quietly works magic, keeping the filling plush—don’t skip it, even if it seems like an afterthought.
- Pinch of salt: Trust me, this tiny addition cuts the sweetness and wakes up all the flavors.
- Whipped cream: Swirl on top as a cloud-like finish—store-bought or homemade both work, as long as it’s cold.
- Festive sprinkles or chocolate graduation caps: This is your moment for creativity! The little chocolate caps come together fast and usually draw a crowd of helpers.
- Fresh berries: Juicy, tart accents for brightness—pat them dry first, so they don’t slide right off.
Tired of Takeout? 🥡
Get 10 meals you can make faster than delivery arrives. Seriously.
One email. No spam. Unsubscribe anytime.
Instructions
- Prepare the pans:
- Preheat your oven to 325°F (160°C) and line each mini muffin cup with a paper liner (the colors always seem to spark a little extra joy, especially if you match your school colors).
- Mix and press the crust:
- Combine graham cracker crumbs, sugar, and melted butter in a bowl until they feel like damp sand; use about a tablespoon per liner, pressing with the back of your spoon till firm and even.
- Bake the crusts:
- Five minutes in the oven sets the stage — when you catch a whiff of warm biscuits, pull them out and let cool briefly.
- Blend the cheesecake filling:
- With the mixer on medium, whip softened cream cheese until silky; beat in sugar, then eggs one by one, vanilla, sour cream, and a pinch of salt, stopping as soon as it all comes together smoothly.
- Fill and bake:
- Spoon batter almost to the top of each crust; they’ll puff slightly as they bake. Bake for 13 to 15 minutes, just until the centers barely jiggle — resist overbaking, they’ll finish setting as they cool.
- Cool and chill:
- Let the bites sit in the pan for 10 minutes, then carefully transfer to a wire rack (I usually nudge them out by the liner edges). Once at room temperature, pop them in the fridge for at least half an hour to fully firm up.
- Decorate and serve:
- Right before serving, pipe or dollop whipped cream, then top with berries, sprinkles, or homemade chocolate graduation caps (kids love assembling these with tiny pieces of licorice for tassels).
 Save to Pinterest
 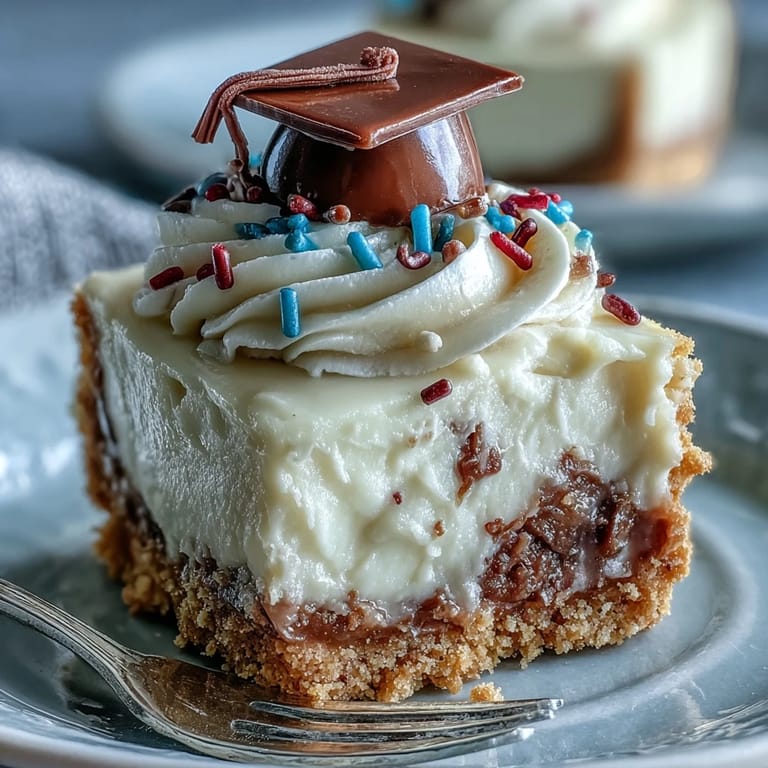 Save to Pinterest
 Watching the graduates toast each other and sneak second helpings, there’s always a moment when the kitchen quiets, and I catch someone closing their eyes to savor just one more bite. It’s in those exchanges—a hush before the next laugh—that these simple cheesecakes feel part of the celebration’s heart, not just its dessert table.
How to Make the Perfect Chocolate Graduation Caps
The secret is to use mini chocolate squares for the mortarboard and a small piece of red licorice string for the tassel. Let your chocolate bases cool fully before adding licorice—otherwise, it softens too much to stick. I’ve found pressing everything together gently, then chilling the caps a few minutes in the fridge, keeps the toppers firm right until serving.
Make Ahead for Stress-Free Party Prep
Cheesecake bites are forgiving; you can bake them the night before, leaving you free to wrangle balloons or iron regalia the day of. Just wait to dollop on whipped cream and decorations, as that keeps them looking crisp and freshly made. If you’re prepping for a big party, a second muffin tin helps speed things up, and refrigerating two trays stacked with parchment between saves fridge space.
Personalize for Any Graduate’s Style
I love letting everyone decorate their own on party day—some opt for berries, others mountains of sprinkles, and the bold few load on both. It’s a small chance for self-expression amid all the matching caps and gowns, and the dessert table ends up looking as diverse as the class itself.
- Set up a mini topping bar and watch guests’ faces light up with choices.
- If you need to go gluten-free, crush gluten-free cookies for the crust—easy swap, same great taste.
- Line your storage container with paper towels to keep bases from getting soggy overnight.
 Save to Pinterest
 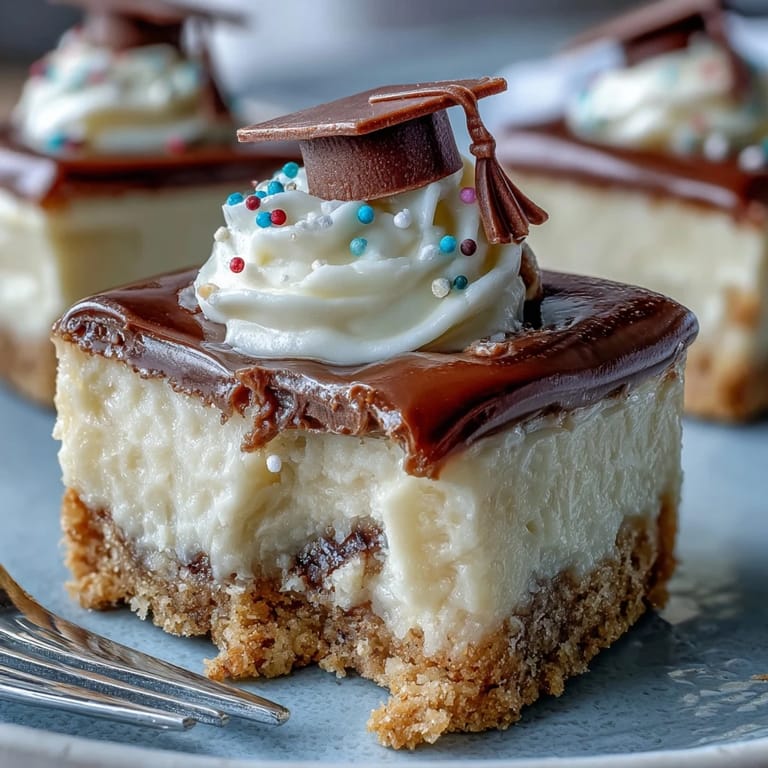 Save to Pinterest
 Let these cheesecake bites be your no-stress, high-celebration secret—cheers to the grad, and to the baker, too.
Recipe FAQs
- → How can I prevent cracks in the cheesecake centers?
Avoid overmixing the batter and stop as soon as ingredients are combined. Bake at the recommended temperature and remove when centers still have a slight jiggle. Cooling gradually—first in the pan, then on a rack—helps prevent cracks.
- → How do I tell when the bites are done?
The edges should look set and the centers will have a gentle jiggle when you shake the pan. Overbaking dries them out; they firm up as they cool and chill.
- → Can I prepare these ahead of time?
Yes. Chill the bites for at least 30 minutes before serving; store covered in the refrigerator up to 24 hours. Add whipped cream and delicate decorations right before serving to keep them fresh.
- → How can I make a gluten-free crust?
Substitute gluten-free cookie crumbs in place of graham crackers using the same weight or volume, then mix with sugar and melted butter and press into liners as directed. Bake the crust briefly before adding the filling.
- → What are festive topping ideas for a graduation theme?
Use whipped cream swirls, fresh berries, mini chocolate squares as caps, licorice strings, colored sprinkles, or edible gold dust to echo school colors and create playful graduation motifs.
- → What's the easiest way to remove the bites from the pan?
Line the pan with paper liners for simple removal. If not using liners, cool in the pan for 10 minutes, run a small offset spatula or knife around each cup, then lift onto a rack to finish cooling.